EasyVVUQ and Cloud Execution via Kubernetes
Author: Vytautas Jancauskas, LRZ (jancauskas@lrz.de)
To run code examples in this tutorial you will want to download it first and run it on a Jupyter notebook server running locally. That is because the examples assume you have configured access to a Kubernetes cluster. So if you are viewing this in our Binder you will want to instead open the copy of this tutorial that is located in the EasyVVUQ source code under tutorials/kubernetes And then you will want to open that notebook in your local Jupyter instance.
This tutorial assumes that you have access to a Kubernetes cluster. Like the ones provided by Google or Amazon. The next thing you need to do is to build a Docker container for your application. I have found that most online resources don’t explain it adequately in the context relevant to us so I will outline the required steps here.
Our focus here is the Kubernetes execution method - the code executed is based on our “Vector Quantities of Interest” tutorial. If you are unfamiliar with EasyVVUQ we recommend that you read this previous tutorial before continuing with this one.
The first thing you need is a Dockerfile providing instructions on how the execution environment should be setup (which software to build and install etc.). Here is the Dockerfile we made for EasyVVUQ. Yours will look different but I hope you will see that it is fairly straightforward. For further information please consult this guide.
[1]:
!cat kubernetes/Dockerfile
FROM ubuntu:latest

RUN apt-get update && \
    apt-get install -y python3-pip && \
    apt-get install -y git && \
    apt-get install -y tini && \
    pip3 install easyvvuq && \
    git clone https://github.com/UCL-CCS/EasyVVUQ.git

ENTRYPOINT ["tini", "--"]
You will need to register for an account on DockerHub. Or if you don’t want your Docker image to be publicly accessible you need to look into private registries, for example here, but this will usually be provider specific. Then you need to build your container, login to DockerHub and push the image. After that it will be accessible to run in your Kubernetes cluster.
docker build -t user/imagename:tag .
docker login
docker push user/imagename:tag
In order for the code examples below to work you need to have a valid ~/.kube/config file. Details will differ based on your provider, but in the case of Google Cloud you can do it as shown below. Here easyvvuq is a cluster name. It is created from a cluster template. Again, this will be provider specific, consult their documentation.
[2]:
!gcloud container clusters create easyvvuq
WARNING: Starting in January 2021, clusters will use the Regular release channel by default when `--cluster-version`, `--release-channel`, `--no-enable-autoupgrade`, and `--no-enable-autorepair` flags are not specified.
WARNING: Currently VPC-native is not the default mode during cluster creation. In the future, this will become the default mode and can be disabled using `--no-enable-ip-alias` flag. Use `--[no-]enable-ip-alias` flag to suppress this warning.
WARNING: Starting with version 1.18, clusters will have shielded GKE nodes by default.
WARNING: Your Pod address range (`--cluster-ipv4-cidr`) can accommodate at most 1008 node(s).
WARNING: Starting with version 1.19, newly created clusters and node-pools will have COS_CONTAINERD as the default node image when no image type is specified.
Creating cluster easyvvuq in us-central1-f... Cluster is being health-checked..
.⠏
Creating cluster easyvvuq in us-central1-f... Cluster is being health-checked (
master is healthy)...done.
Created [https://container.googleapis.com/v1/projects/graphite-flare-278712/zones/us-central1-f/clusters/easyvvuq].
To inspect the contents of your cluster, go to: https://console.cloud.google.com/kubernetes/workload_/gcloud/us-central1-f/easyvvuq?project=graphite-flare-278712
kubeconfig entry generated for easyvvuq.
NAME      LOCATION       MASTER_VERSION   MASTER_IP      MACHINE_TYPE  NODE_VERSION     NUM_NODES  STATUS
easyvvuq  us-central1-f  1.17.15-gke.800  35.238.138.25  e2-medium     1.17.15-gke.800  3          RUNNING
The code in the cells below sets up an EasyVVUQ campaign to analyse a simple epedimiological model (using the sir code) - for more details see the “Vector Quantities of Interest” tutorial. We will only explain the differences caused by Kubernetes execution in this document.
[3]:
import easyvvuq as uq
import chaospy as cp
import matplotlib.pyplot as plt
[4]:
params = {
    "S0": {"type": "float", "default": 997},
    "I0": {"type": "float", "default": 3},
    "beta": {"type": "float", "default": 0.2},
    "gamma": {"type": "float", "default": 0.04, "min": 0.0, "max": 1.0},
    "iterations": {"type": "integer", "default": 100},
    "outfile": {"type": "string", "default": "output.csv"}
}
[5]:
encoder = uq.encoders.GenericEncoder(template_fname='sir.template', delimiter='$', target_filename='input.json')
decoder = uq.decoders.SimpleCSV(target_filename='output.csv', output_columns=['I'])
[6]:
campaign = uq.Campaign(name='sir', params=params, encoder=encoder, decoder=decoder)
[7]:
vary = {
    "beta": cp.Uniform(0.15, 0.25),
    "gamma": cp.Normal(0.04, 0.01),
}
[8]:
campaign.set_sampler(uq.sampling.PCESampler(vary=vary, polynomial_order=5))
The only difference between this example and the one where we run the simulation locally is the type of action we pass to sample_and_apply. In this case we use ExecuteKubernetes (in contrast to ExecuteLocalV2 employed for local exection). For this simple application we only need to specify two arguments to ExecuteKubernetes - the image to be pulled from DockerHub and a way to run the simulation.
The first argument to ExecuteKubernetes is the image specified using the tag specified in your build command in the format user/imagename:tag (below we use orbitfold/easyvvuq:latest). The input configuration is automatically transferred to the Kubernetes pod using the Kubernetes API. Input files will be stored under the /config directory. You need to have this in mind when running the simulation. Likewise the results are retrieved from standard output of the pod. This output is
sent directly to the Decoder. Which might mean you will want to exercise some care when designing decoders for these cases. In this case there is nothing special to be done. If your simulation produces a lot of data you might have to use a script inside the container to extract the quantities of interest and print them to stdout.
The second argument to ExecuteKubernetes is the command to be executed inside the running container. If you look at the way we have created the Docker image, EasyVVUQ is cloned to the root directory, which means the path to the simulation code is /EasyVVUQ/tutorials/sir. We run the sir simulation and then we print the output.csv file to stdout using the cat command. It will be picked up by our Kubernetes backend.
[9]:
execution = campaign.sample_and_apply(
    action=uq.actions.ExecuteKubernetes(
        "orbitfold/easyvvuq:latest",
        "/EasyVVUQ/tutorials/sir /config/input.json && cat output.csv"),
    batch_size=8).start()
[20]:
execution.progress()
[20]:
{'ready': 0, 'active': 0, 'finished': 36, 'failed': 0}
The remaining steps are exactly the same as we would have in the case of local execution.
[21]:
result = campaign.analyse(qoi_cols=['I'])
[22]:
result.plot_sobols_first('I', xlabel='t')
[22]:
<AxesSubplot:xlabel='t', ylabel='First Order Sobol Index'>

[23]:
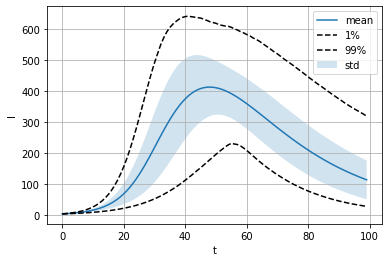
result.plot_moments('I', xlabel='t')
[23]:
<AxesSubplot:xlabel='t', ylabel='I'>
[ ]:
